It takes a lot of commitment to keep our heritage tourist trains gracing our rails, with services like 3801 Limited’s Cockatoo Run linking the City of Sydney with Wollongong and the Southern Highlands several times each month, making a significant contribution to NSW tourism in so doing. After 30 years of operations, its fortunate that the Eveleigh Projects team have developed the know how to keep the show safely on the road – notwithstanding the surprises that come part and parcel of a running vintage fleet! Our volunteers are currently mid way through an intensive battery box rebuilding program on each carriage of the running fleet to ensure the continued safe and reliable operation of heritage carriages on the rail network.
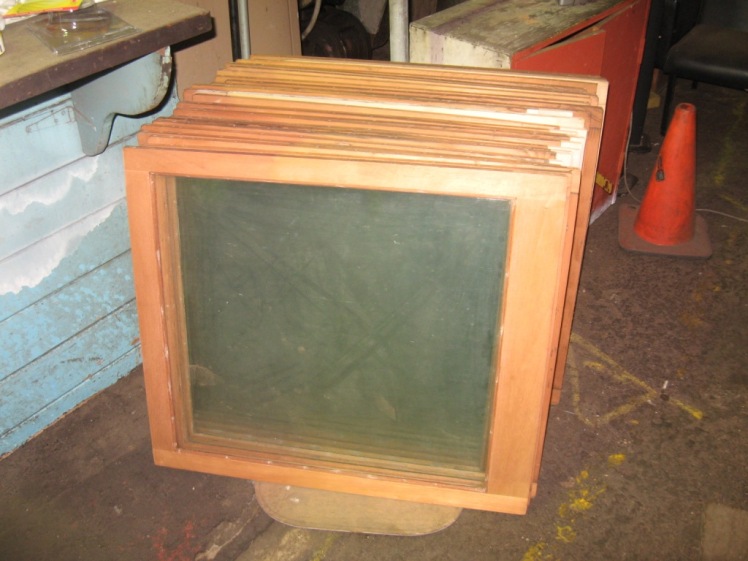
This work involves stripping the battery box down to the last nut and bolt, and discarding any life expired timber or other components before completely rebuilding the unit. The box illustrated has just been fitted to first class compartment car XBS2158, which is currently in the process of being reactivated at Eveleigh (after many years of storage off-site) for a return to tourist train service.
Eveleigh is home to a unique team of skilled car builders who form a repository of invaluable knowledge and expertise that is becoming increasingly rare in this day and age. Our volunteers share skills with 3801 Limited, The Heritage Locomotive Company and Lachlan Valley Railway to keep the carriages under the care of each in good maintenance.
With a fresh set of well maintained batteries snug inside the new battery box, we shouldn’t have to look at this again for many years and after many more thousands of kilometres of tourist train travels.
Following on from our last post about the disassembly and preparation of the compartment fans in the XBS, work has subsequently progressed on their finishing and reassembly. As always, in the interests of recording the process for posterity (and to assist the next poor souls who decide that refurbishing a set of 24V fans might be a fun way to kill a week or three), we have set out the steps involved in getting the fans to their current state. For the best finish, the disassembled components were left to sit for a fortnight or so following paint stripping. This ensured that any residue had ample time to cure before painting, and would ensure the best possible adhesion of the paint system. Following a quick once over with some phosphoric acid to treat any surface rust, the components each received 2 healthy coats of etch grey primer. This was then followed by two coats of Metal Shield Epoxy Enamel in Classic Cream, with the exception of the fan blades which were painted silver. As usual, the paint was supplied by our good friends at Dulux.
After leaving this to sit for 24 hours, reassembly was commenced. The plates were easily re-attached by tapping in a couple of small metal push rivets – and not even these escaped the onslaught of Classic Cream! With hindsight, it would have been nice also to have gone to the lengths of removing the plates when restoring the CAM fans (https://eastcoastheritagerail.com.au/cam10/), as it’s a gauge of the quality of the restoration project, with few carriages receiving such a thorough going over as this one is having. The devil’s in the detail – and in this case it’s a credit to the dedication of the skilled team at Eveleigh Projects, always ensuring jobs such as this are done to the best of their ability and to the highest standards.
On observation of the plates, it’s interesting to note that while the fans in the CAM were manufactured by Stones of England, those in the XBS are home grown – having been made by Elcon in Australia. Following these, next up next for reattachment are the speed controller handle and the fan motor cradle. It never ceases to amaze us how easily these things can fit back together after a bit of tlc, especially given that the fans were temperamental to say the least during the disassembly leg! But now comes the tricky bit – after going the extra mile previously in removing the stator (refer to the earlier fan post below) to allow the components to be fully treated and restored, it needed now to be reinstated in its rightful place. In the end this was achieved with a bit of signature railway “gentle persuasion”, courtesy of a small mallet and drift. But would it work after having been disturbed from its resting place of the better part of eight decades?
First, the brush contact mounts were refitted to the motor casing and leads then run to each, one for positive and the other for negative. The motor was then reassembled with little difficulty, being held together by just 2 threaded bolts, before being tested using (appropriately enough) a stalwart 12V transformer pilfered from the model railway. Performing these little projects away from Eveleigh at private workshops really helps the project progress, as you certainly couldn’t find one of those in The Large… But the result: good news! It works on 12V, so will be fine for 24V carriage voltage later on.
Having passed the test with flying colours, the motor is then mounted in its cradle, a process which for this style of fan is a ‘breeze’, using 2 simple plugs to allow the fan motor to be easily removed from the cradle. New electrical leads were also fitted at this point to allow for reconnection to the carriage electrical supply upon reinstallation. This is followed by the fitting of the caps to seal in the motor brushes and the four brackets to attach the fan grill, and we’re now ready for the final check.
The variable speed controller works, adjusting the RPMs as it should – so once the grill returns from the chrome platers it will be reinstalled, making this fan complete and ready for interim storage prior to reinstallation later in the project. So now onto the next fan, and at this point a side-by-side comparison exemplifies both the quality of the restoration and scope of the skills which are alive and well among the volunteers of Eveleigh Projects team – the fan has been subjected to a miraculous restoration in its own right!
Keep an eye out for further XBS updates in the coming days…
In each compartment of the first class BS carriages was fitted a single wall mounted electric fan running on 24V DC, mounted above the doorway to assist with the circulation of air. These veterans have all no doubt given many hours of stellar service on those stuffy days when travelling in compartments would otherwise have lost its lustre! During the course of restoring the carriage, each unit was removed from its compartment and set aside for rebuilding and restoration as close as possible to original condition. The work started with somewhat of an audit of the seven fans from XBS2158, revealing a few variants among the collection and giving some insight into the frequency with which these were repaired/ replaced in railway service.
Both three and four bladed designs were evident in similar numbers:
One fan featured a complete departure from the standard eight-spoked ‘medusa’ grill design, while another had been retrofitted with an additional guard on the lower part of the grill, nearest to where passengers’ fingers are trying to operate the toggle switch to set the fan speed.
The one thing that all did have in common was that all were rather tired, so they were relocated to our off-site workshop where two of our volunteers have been diligently working through the issues, one fan at a time. The following is an insight into what effort is lavished on a single fan! The first step is to remove the grill – these little brass screws put up quite a fight! This one needed a little bit of heat to coax it into cooperation:
With the fan now looking somewhat naked, the next step is to remove each of the four grill support arms. Once removed, it becomes clear that their mounting bolts will all need replacement:
Then the Romford drive screw connecting the upper motor unit to the wall-mount base is removed, allowing for them to be separated:
This brings us to the ‘clockwork’ mechanism, which spends the vast majority of its life hidden away within the base spending facing a piece of polished timber. This mounting however, is not airtight – to which the all-permeating soot attests! Unlike those fitted to the CAM (https://eastcoastheritagerail.com.au/cam10/), these fans have multiple speed settings. Our regular ‘electrical’ bloggers will appreciate the basic yet effective circuit design, impressively functional in its simplicity. For the young whipper-snappers of today, this is essentially what is condensed inside modern electronic chips!
The speed selection handle needs removing to allow the several layers of paint which have been caked on over the years to be stripped back. Again, the mechanism is rudimentary yet effective, although it took quite a bit of elbow grease to separate from the base!
Two simple threaded bolts release the motor housing – but of course we ought to know better by now than to think that it will come apart easily just because we’ve removed the bolts!
Next to come off is the brush inspection cover.
The brush caps are then unscrewed, but unfortunately a number of these were either missing or extremely brittle, necessitating replacement. Please get in touch if you have any spares gathering dust somewhere on a shelf! eveleighprojects@gmail.com
Slipping off the brush end of the casing finally reveals the inner workings, a trifle dirty but in otherwise excellent condition.
And for those playing at home, this is what an XBS compartment fan looks like in kit form!
After a first pass with the paint stripper things are looking better already, and our thoughts turn ahead to what colour these fans will be post-restoration. Unlike the CAM fans, the first coat here appears to be a cream/ off-white colour, so this is what they will be reinstated in.
Going the extra mile, the next step is to remove the stator to allow the casing to be cleaned fully. These are fitted with fantastic little electrical clips! After a bit of persuasion, the stator slips out of its casing which can then be thoroughly cleaned.
The true quality of a restoration lies in the details, and in keeping with the high standards of the Eveleigh projects we are always looking to go above and beyond the call to really set our restorations apart. As such, we also tapped out the speed dials (whose lovely details had only been revealed for the first time in decades once the congealed paint had been removed) so we could clean out the area behind them, and again the original cream paint was found. We’ll put these plates back on last, following the repainting and reassembly of the fans. Quality is the name of the game here – while we are already putting in the effort, we may as well do it properly!
So after some hours of work stripping them all down, this is where we are up to currently – the next stage is to begin a thorough repainting, where again no detail will be left unattended to. Please don’t hesitate to get in touch if you feel you can help us out financially with the projects, as now that we’ve done a full assessment on this job we expect we’ll spend around $700 restoring all seven fans alone. Feel free to drop us a line eveleighprojects@gmail.com if you can help out!
Looking good so far after completing paint stripping, but a ways to go yet!
Keep an eye out here for more updates on the XBS fan project.
We’re well overdue for a blog update, so let’s wind back the clock and review some of our work from late last year.
Finding a BS car in largely original configuration is a somewhat rare occurrence these days, with most of the S-type carriages represented in preservation being their second class FS counterparts (in fact, when this car is completed it will be the only operable BS car based in Sydney). This makes it rather more valuable than it appears at first glance, not only thanks to the comfort it provides with its cosy 6-seat compartments (compared to 8 in the FS cars), but also due to its significant value to the heritage community. With this in mind, this restoration will be keeping everything as original as possible while still telling the story of this car, which includes a few modifications that have crept in over its years of service with the NSWGR.
At the start of its life, the toilet windows were timber framed – the same as the rest of the car – but during its career, XBS2158’s were replaced with fixed windows featuring frosted panes to provide privacy in the WC. These have been mounted and sealed using rubber locking strips:
The Chippies were understandably overjoyed at this, as we only had to assemble a set of 29 timber window frames, rather than the full complement of 32 as would have been required for the fair-dinkum original when it first rolled out of the Clyde Engineering workshops in November 1937. Each of the existing windows was first removed before being individually assessed to determine what could be salvaged of the original frame. Water damage has proven to be the most common symptom throughout – witness to the car’s time spent in storage – but thankfully for the most part this was confined to the lower mortise and tenon joints. This deterioration had been accelerated as a result of the Railways fitting the dreaded Tee-nuts in the later years of their service, so these have now been duly removed and replaced by timber plugs.
The installation of fresh timber plugs has meant we have been able to use heavy gauge brass wood screws to attach the window latches, as per tradition. The windows that proved beyond repair were discarded and replaced with spares sought from our extensive window store at Eveleigh. Here is an original that’s been in storage since it was brought to the LES following the closure of the Carriage Works. This window has never been used… the LES is home to some real treasures!
Pretty soon we had a good looking set of windows that just needed a final sand before painting. Dulux are big supporters of our restoration efforts at The Large, and we are immensely appreciative of their invaluable support in the provision of superior paints from their oil based range.
The paint system used for the window exteriors is oil based Preplock, of which we apply two coats:
This is then followed by two coats of Dulux Super Enamel Indian Red – this paint has been proven to wear remarkably well in what is a gruelling environment when in regular mainline usage. This system has proven to last well in excess of 10 years, no mean feat given our cars are often steam hauled! (Apologies at this point to the Candy fans among you, as XBS2158 is being painted into the Indian Red livery complete with cream ‘buff’ lines – the way God intended!)
The inner faces of the frames meanwhile are painted with 3 coats of clear varnish, giving a smart internal finish.
We spent over 60 hours just painting the windows – not including all the prep and timber repairs. It is easy to forget when appreciating a gleaming carriage on the platform the work that goes in behind the scenes long after the passengers and crew have gone home! For the best results, the next step is to stack them up in a safe place and let the paint cure fully before we trim the excess paint off the glass pane and fit the windows later in the project.
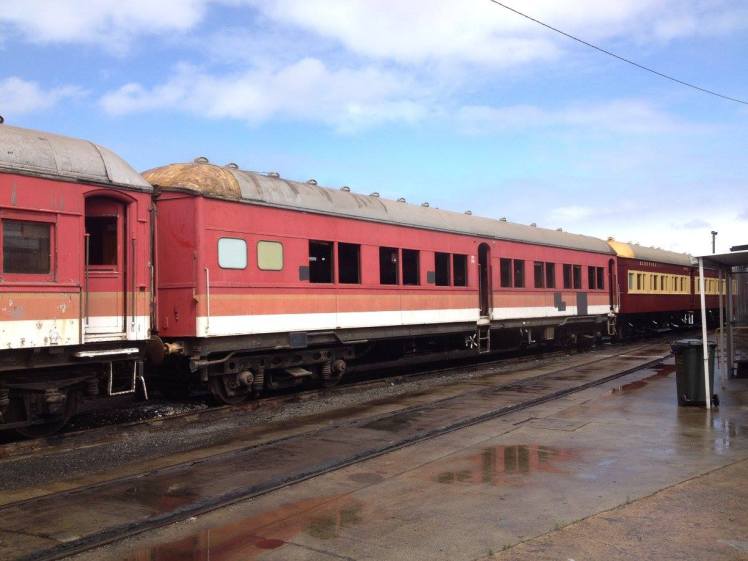
With the CAM project all but complete, the team at Eveleigh are keeping the momentum going by starting work on the full overhaul and restoration of first class compartment car XBS2158.
“this one looks good, let’s take it home and do it up!”
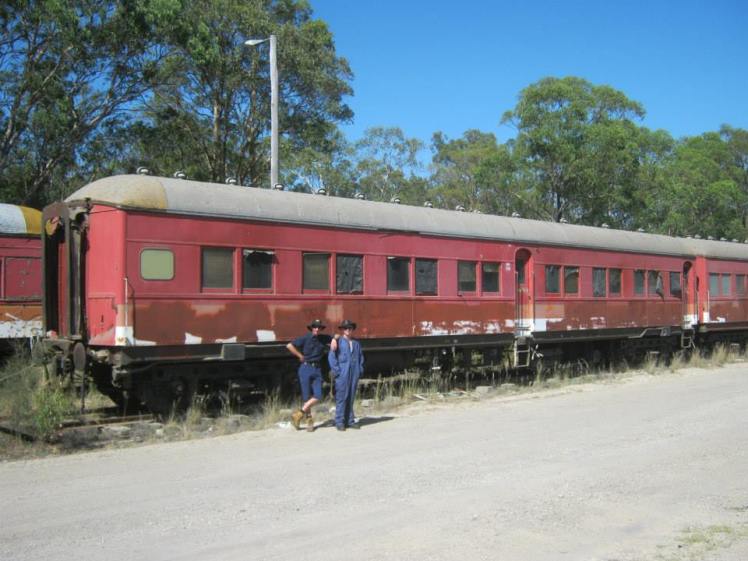
This car is currently undergoing a full restoration for the NSW rail heritage community.
This car was facing an uncertain future on a private property in the NSW Hunter Valley. It was subsequently transferred to Sydney in late 2014 to facilitate the re-activation works in keeping with the long standing Eveleigh Railway Workshop tradition repairing heritage rolling stock.
Overall this car is in pretty good shape, but there is always much work to be done. Some collision damage is evident from its railway service on one end of the car, requiring some repair works.
Daniel and James have been leading the charge, stripping out the toilet area where a new steel floor has been sought, and duly cut to size and welded in situ.
The vertical columns have been replaced also and are looking great. A quick coat of metal primer and the whole show is now awaiting the steel sheeting, which has been cut to size to seal the carriage exterior.
Window work is well underway also, with Project Leader Daniel coordinating the lads to slip the old windows out of the car to allow components to stripped. Each of these windows will require an individual assessment to determine if it can be salvaged and repaired…
There are a lot of metal window fittings that need cleaning and polishing so get in touch if you think you can offer some worthwhile assistance!
Having been in storage for so many decades, there is a lot of nuisance dust in the carriage. So the boys have spent a lot of time working through each compartment cleaning them out. There are a lot of interesting heirlooms behind the seats!
But there is always soooo much cleaning to be done! More XBS updates soon.