Tank Time

Any steel water vessel eventually succumbs to time and corrosion, and alas the time has come to replace the water tank on L516. The group went about removing the old water tank using a few choice tools:

TankTime - pic01

Time was taken to photograph key components to make the reassembly a little easier.

TankTime - pic02

While a new tank was sourced, the tank straps were stripped and repainted.

TankTime - pic03

Before Ross and Todd spent a day test fitting the tank (with the help of our trusty bottle jack).

TankTime - pic04

Garry sourced and installed vibration suppressing rubber, which is fitted between the tank and the steel straps.

TankTime - pic05

Then the new plumbing was installed. We are looking forward to the day when we can enjoy running water and a cup of tea in L516.

TankTime - pic06

TAM Fans & how far they’ve come

Over the years, dust and grime has accumulated on the fans in L516’s compartments, leaving them looking rather unloved. The ventilation fans (known as “Imperiston” fans) were sent to our friends at the Rowling Electrical workshops to restore them to their former glory.

This is how it’s done:

TAM_fans_01

Step 1 – Disassemble the fan units. The insulation on some of the wiring was in a very poor state, which is a common symptom of life-expired cloth coated cables.

TAM_fans_02

Step 2 – Check the motor works using a suitable power supply, then remove the motor from the casing and blow compressed air through the motor to flush all the soot and dust out.

TAM_fans_03

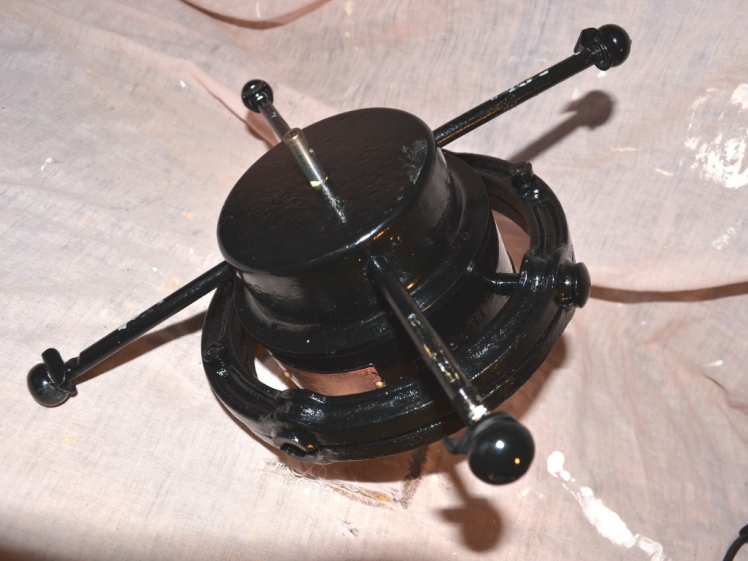
Step 3 – Hit the parts with high pressure water, removing the white paint to reveal the original black paint. Some paint stripper helps for the more stubborn paint. Leave the parts out in the sun to dry.

TAM_fans_04

Step 4 – Apply 1 coat of primer and 2 coats of gloss enamel and leave to cure for a week or so.

TAM_fans_05

And don’t forget to paint the fan blade guard too.

TAM_fans_06

Step 5 – Remove the bearing from the motor shaft, soak overnight in kerosene, disassemble the bearing, clean, re-grease and re-install:

Step 6 – Reassemble the fan units. This needs to occur in a number of discrete logical steps. Start by securing the 2 metal “hoops” to the motor housing.

TAM_fans_09

Step 7 – Fit the 3 remaining support arms for the fan blade guard.

TAM_fans_10

Step 8 – Secure the motor to the motor housing, followed by the fan blades and fan blade guard.

TAM_fans_11

Step 9 – Reassemble the mounting block, new wiring and the motor rear cover.

TAM_fans_12

Voilà! The Rowling Workshop was doing a special 4 for 1 deal the day we visited.

TAM_fans_13

A nice touch is to polish the builders’ plate and apply a wax finish to prevent tarnishing over time. L516’s fans date 1926-1929, over 10 years before TAM502 was built.

TAM_fans_14

It is interesting to note that these “Imperiston” fans were made by Stones, the same English company who made the under-car axel-driven generators used on NSWGR cars. Stones made a large range of equipment, from steam locomotive booster units to train lighting to axel boxes. Once source even suggests that Stones made the fans used on the Titanic.

TAM_fans_15
TAM_fans_16

Images used with permission from Graces Guide and can be found at: http://www.GracesGuide.co.uk

The fans for L516 are now ready for re-installing in the sleeping compartments as time permits.

Lights Up!

With all the excitement in the lead up to Christmas 2013, L516 had its own lights up in the “Lounge” end in time to celebrate the festive season.

We’ve taken a dingy blank canvas.

Lights up 01

And installed a high quality 1920’s style ceiling to suit the rest of the car.

Lights up 02

Refurbished and installed original fittings.

Lights up 03

The results speak for themselves.

Lights up 04

This is a great time to reflect on what our volunteers have achieved in 2013, and thank all our friends and supporters for their help throughout the year.

Car Ends – Part 1

Steve has been steadily rebuilding the upper ends of the car in order to restore the timbers to a high quality weather proof finish. Some may baulk at these kinds of jobs because they quickly become major, but Steve taking the time to do this work now will help ensure the car has a long low maintenance running life.

Last time we checked in, the new matchboard timbers were back in place and undercoated:

Car Ends 01

Before the studs were replaced with the help of a large hammer and a socket set, followed by another coat of primer:

Car Ends 02

The cornivce timbers replaced:

Car Ends 03

And then undercoat ready for the Indian red.

Car Ends 04

One more quick repair.

Car Ends 05

…and Steve is onto the other end of the car to do it all again!

Car Ends 06

Work in progress. Watch this space!

Around The Twist

With all pressed metal sheets in place, we must now manufacture curved timber mouldings to cover the joint where the main roof sheets and the end vertical sheets meet.

The art of bending and re-shaping timber is rather specialised and typically utilises purpose built machinery. We’ve got the next best thing – an 1880s railway workshop!

This is how its done:

Step 1: Take some timber that is either green or poorly seasoned. Machine your chosen profile.

Step 2: Cut timber to the correct dimensions, then soak each length in boiling hot water. We used this piece of conduit, which is strapped to a piece of timber to avoid the pipe bending due to the heat of the water (we learnt the hard way!). Allow to soak for 15 mins, top up water as it is absorbed by timber.

AroundTheTwist_Pic03

Step 3: Form timber by laying on bench and forcing a round template, ensuring to support the timber all the way. Not enough support, and you’ve got (another) broken piece of timber for the firebox.

AroundTheTwist_Pic04

Step 4: Installation is a 2 stage process. First we install the base strip, which is then followed by the dressed strip. This provides sufficient coverage of the join.

Step 5: A light sand and a coat of undercoat sees us out for the day.

Voilà!

Its time to call the painters again to apply the final coats.

Ashes to Ashes, Panels to Cars

Our car builder Davo has been very busy preparing the Australian red cedar panels for the final fit out of the “Lounge” end of L516. These panels were salvaged from the former NSWGR sleeping cars at the Zig Zag Railway (which were set for scrap) and Dave has done an outstanding job bringing them back to their former glory. It is sad to think that the cars at Zig Zag have since been reduced to a pile of ashes following the recent bushfires in the Blue Mountains, but it is great that this panelling has been saved and put to such a fitting use.

One of the refurbished panels was test fitted between the window frames.

ashes2ashes - pic03

Our weekday volunteers have also been making progress with the former Attendant’s compartment, which we plan to make into a toilet space. Work completed includes a small repair to the timber near the roof vent, while the window, sills and shutters have been installed along with associated timber panelling.

Painting of the pressed metal roof started with a coat of etch primer, followed by the installation of the wooden light bases (using a string line to install them in a straight line).

ashes2ashes - pic06

Outside, the our carpenters continue rebuilding the timber work around the door frame and upper ends. Some cosmetic work had been performed here a few years back, but a closer inspection revealed that some additional attention was required to replace rotten timber panelling.

It doesn’t take the boys long to have it looking brand new. Taking the time to do this work now will help to ensure the car has a long low maintenance life in service.

Meanwhile, Ross’ engineering expertise was called upon to replace some corroded steel stud plates used to hold the gangway curtain in place. These will be refitted in due course.

ashes2ashes - pic11

After lunch, focus was turned to building out the corridor section near the toilet. Brett took the lead starting with a sturdy timber frame and a wide grin!

ashes2ashes - pic12

…before installing the Masonite sheeting…

ashes2ashes - pic13

…followed by fitting the original pressed metal sheets, which were then painted with etch primer.

Next step is to manufacture the moulding to cover the join. See “Around the twist” post.

Before Too Long

Restoration of heritage rolling stock requires many diverse skills, and the 3801 Limited team called on the wood turning expertise of Michael from the Men’s Shed at Engadine. Michael used his workshop lathe to turn up several timber discs which will form the bases for the light fittings prepared previously (refer “Lights and Vents” blog update). As the car ceiling is curved, Steve ran the discs through the band saw to cut the angle to match the pitch of the ceiling.

01_Discs

We under coated the discs ready for installation.

02_Discs

Todd kept things moving along inside the car, cutting the holes through the metal sheets for the vents.

03_Roof

Before test fitting 2 of the vents to check that they fit and see how they will look.

04_Roof

We use a flexible gap filler to ensure a smooth transition between the joints in the metal sheets. At times, it’s a tedious job, but the results are worthwhile.

05_Roof

After the BBQ lunch, the work group got busy manufacturing a batch of rubber washers to replace life expired ones. These go between the glass light shades and the metal light fittings. We use two different sized Wad punches, one to cut the outer edge of the washer, and the smaller cuts out the inner hole.

06_RubberWashers_01

To put that another way, here is step 1:

07_RubberWashers_02

Followed by step 2:

08_RubberWashers_03

At the end of another successful work day, we can cross more jobs off the to‐do list. It is amazing what a dedicated team of young and old volunteers can achieve in their spare time.

09_Roof

Can’t wait for next weekend. More updates soon.

Time for a road trip!

With lighting now installed in the gutted end of L516, our weekend warriors focused their attention on furnishing this end of the car. This will be a top down approach, starting with the roof and light fittings. Ritchie Bros cars were synonymous with elaborate pressed metal roof mouldings, which remain in the sleeping compartments at the other end of L516.

GuttedEndSept13_01

Sourcing the original pressed metal roof moulding pattern quickly proved difficult, and copying an existing pattern was prohibitively expensive. After a great deal of research, Jean Morrison from Heritage Ceilings (www.heritageceilings.com.au) suggested we use their Lily pattern, which retains the flowing floral patterns of the original style.

GuttedEndSept13_02

Experienced carpenter and volunteer car builder Chris was happy to provide his Ute to collect the pressed metal sheets from the factory at Bathurst. Although we may have taken a slight de‐tour…

GuttedEndSept13_03

Could this be the first time “4901” has been in poll position at Bathurst?

GuttedEndSept13_04

Down at the factory, Todd ensures that the precious cargo is safe and secure for the return trip to Sydney.

GuttedEndSept13_05

Back at the shed, the Saturday working bees have the sheets installed one at a time and before long we start to get a feel for how it’s going to look. The strings provide additional support during installation, to avoid creasing the sheets. You don’t normally use these in HO scale!

GuttedEndSept13_06

Standing back to admire our handy work, its clear we have a long way to go!

GuttedEndSept13_07

But the work group have it all in hand. Chris starts by pre drilling the screw holes in the sheets.

GuttedEndSept13_08

Then, with the sheet partially screwed in place, the hole is drilled for the light fitting. Eye protection is important when drilling sheet metal.

GuttedEndSept13_09

Then the light globe is re‐installed.

GuttedEndSept13_10

At the close of Saturday, several sheets are installed.

GuttedEndSept13_11

It will take a number of work days to complete this job, but its well worth the wait.

Lights & Vents

With the metal roof progressing well, its time to think ahead and get the jewellery ready for the next part of the restoration project. Our friends at the Zig Zag railway kindly allowd us to salvage whatever fittings we could from the three former NSWGR sleeping cars which are set to be scrapped. These cars have been used for accommodation during steaming weekends at Zig Zag, but are sadly at the end of their life.

Lights&Vents01

These cars pre‐date L516 (TAM502), with their timber frames and Pullman body work, but the light fittings and vents are basically the same.

Lights&Vents02
Lights&Vents03

Back at the Rowling workshop, cleaning started with the lamp shades

Lights&Vents04

But wait! There’s more!

Lights&Vents05

Before the glassware was paired up with the metal light fittings.

Lights&Vents06

The vents have attracted over a century worth of soot and cobwebs, but a bit of elbow grease and they come up real nice too! Nickel plated brass was the most common type of vents.

Lights&Vents07
Lights&Vents08

These sleeping car vents incorporate a louver mechanism, which can be opened or closed depending on ventilation needs.

Lights&Vents09
Lights&Vents10

Different cars, different eras, different styles. Somewhere along the track, this plain copper vent must have been in fashion. We’ll find a place for it in L516.

Lights&Vents11

When the roof is finished, this jewellery will be installed. Till next time.

Overhauling a Carriage Part 3: New Battery Boxes

Often overlooked, the battery boxes are an essential part of a well maintained heritage train. While the work is far from glorious, this sort of maintenance work needs to be done.

An old (spare) box in storage at Eveleigh was stripped and metal components treated for corrosion. Due to the years of acidic fumes, the timber was mostly beyond salvage, with new origan planks used in place. The Tuesday work group applied 2 coats of low sheen black paint, and the box was fitted to SFN2182. Who knows when we’ll have to look at this one again?

The cells look pretty snug in there!

SFN_BatteryBox_01

The opportunity was taken to clean the terminals as part of 6-monthly maintenance, which is usually conducted by our Tuesday volunteers.

Pre clean:

SFN_BatteryBox_02

Post clean:

SFN_BatteryBox_03

With the doors fitted, its another job done! Onto the next one.

SFN_BatteryBox_04